
Perhaps one of the most useful and unique features about Elgg 1.0 is its ability to import and export data. Initially this is accomplished via OpenDD, but we have added hooks which make it very easy to add other formats.
I’m going to talk a little bit about how this works. Firstly, Export.
Export works via the views system, and involves creating a brand new view hierarchy for your new format.
We first need to create a plugin, and in this plugin we create a “views” directory. We need to then create a new directory for your format, and then create a couple of views underneath.
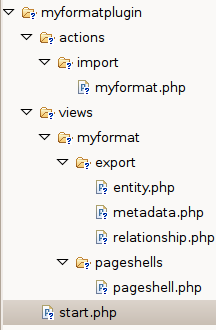 The image to the left shows the necessary file hierarchy that you need to create – in this instance to export “myformat”.
Create a directory called “export”. In this directory place the three php files – entity.php, metadata.php and relationship.php – which handle entities, metadata (and annotations) and relationships respectively.
Each of these files are passed objects via $vars. Depending on which file you are in, this might be $vars['entity'], $vars['metadata'] or $vars['relationship'].
It is then up to you to encode and output the object according to your format.
All that remains is to provide the pageshell which handles how the overall page is displayed. This file may set the content-type header or provide wrapping tags (e.g. for XML output).
pageshell.php is passed $vars['body'] containing the output of your other files.
Providing a handler to deal with importing data is also fairly simple, and works through the action interface.
In your plugin’s init function register the action “import/YOURFORMAT”, and point it to your actions/import/myformat.php, e.g.
<?php

	function myformatplugin_init()
	{
		global $CONFIG;

		// Register import action
		register_action('import/myformat', false,
		  $CONFIG->pluginspath . "myformatplugin_init/actions/import/myformat.php");
	}

	// Initialise
	register_elgg_event_handler('init','system','myformatplugin_init');
?>
This will then register an import action which will be picked up by the administrator import export utility. Your action can access the information it needs to import with the call:
$data = get_input('data');
Elgg 1.0 will ship with native support for OpenDD (both import and export) which will allow administrators to migrate between Elgg classic and the new codebase with a minimum amount of effort.
Elgg 1.0 also offers export views in JSON and PHP native, making it easier to reference the data directly and create mashups.
Over time we will be adding more import and export functionality, and I hope you will be too!