I have recently been exploring some aspects of the Elgg scalability question by exploring how easy it would be to get the latest version of Elgg (1.6) running on a MySQL cluster.
In this article I will document the process, but first I should point out:
- This is highly experimental and not endorsed in any way.
- It is built against Elgg 1.6.1
- This is not canonical and doesn’t reflect anything to do with the roadmap
- This has not been extensively tested so caveat emptor.
Setting up the cluster
The first step is to set up the cluster on your equipment.
A MySQL cluster consists of a management node and several data nodes connected together by a network. Because I was running rather low on hardware, I cheated here and created each node as a Virtual Box image on my laptop – but the principle is the same.
Each node is an Ubuntu install (although you can use pretty much any OS) with two (virtual) network cards, one connected to the wider network (to install packages) and another on an internal network. If you do this for real you should consider removing the internet facing card once you’ve set everything up since a cluster isn’t secure enough to be run on the wider internet.
In my test configuration I had three nodes with name/internal IP as follows:
- HHCluster1/192.168.2.1 – Management node & web server
- HHCluster2/192.168.2.2 – First data node
- HHCluster3/192.168.2.3 – Second data node
HHCluster1 – The management node
Install mysql, apache etc. This should be a simple matter of apt-getting the relevant packages. Clustering (ndb) support is built into the version of mysql bundled with Ubuntu, but this may not be the case universally so check!
You need to create a file in /etc/mysql/ called ndb_mgmd.cnf, this should contain the following:
[NDBD DEFAULT]

NoOfReplicas=2 # How many nodes you have

DataMemory=80M    # How much memory to allocate for data storage (change for larger clusters)

IndexMemory=18M   # How much memory to allocate for index storage (change for larger clusters)

[MYSQLD DEFAULT]

[NDB_MGMD DEFAULT]

[TCP DEFAULT]
[NDB_MGMD]

HostName=192.168.2.1 # IP address of this system
# Now we describe each node on the system
# First data node

HostName=192.168.2.2

DataDir=/var/lib/mysql-cluster

BackupDataDir=/var/lib/mysql-cluster/backup

DataMemory=512M

[NDBD]

# Second data node node

HostName=192.168.2.3

DataDir=/var/lib/mysql-cluster

BackupDataDir=/var/lib/mysql-cluster/backup

DataMemory=512M
#one [MYSQLD] per data storage node

[MYSQLD]

[MYSQLD]
Data nodes (HHCluster2 & 3)
You must now configure your data nodes:
- Create the data directories, as root type:
mkdir -p /var/lib/mysql-cluster/backup

chown -R mysql:mysql /var/lib/mysql-cluster
- Edit your /etc/mysql/my.cnf and add the following to the [mysqld] section:
ndbcluster

# Replace the following with the IP address of your management server

ndb-connectstring=192.168.2.1
- Again in /etc/mysql/my.cnf uncomment and edit the [MYSQL_CLUSTER] section so it contains the location of your management server:
[MYSQL_CLUSTER]

ndb-connectstring=192.168.2.1
- You need to create your database on each node (this is because clustering operates on a table level rather than a database level):
CREATE DATABASE elggcluster;
Starting the cluster
- Start the management node:
/etc/init.d/mysql-ndb-mgm start
- Start your data nodes:
/etc/init.d/mysql restart

/etc/init.d/mysql-ndb restart
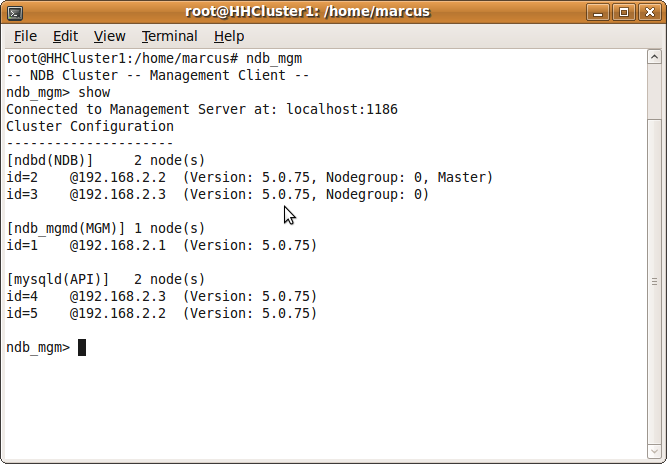
Verifying the cluster
You should now have the cluster up and running, you can verify this by logging into your management node and typing show in ndb_mgm.
A word on access…
The cluster is now set up and will replicate tables (created with the ndbcluster engine – more on that later), but that is only useful to a point. Right now we don’t have a single endpoint to direct queries to, so this direction needs to be done at the application level.
We could take advantage of Elgg’s built in split read and writes, but this would only allow us to use a maximum of two nodes. A better solution would be to use a load balancer here such as Ultramonkey to direct the query to the appropriate server allowing us to scale much further.
I didn’t really have time to get into this, so I am using the somewhat simpler mysql-proxy.
- On HHCluster1 install and run mysql-proxy:
apt-get install mysql-proxy

mysql-proxy --proxy-backend-addresses=192.168.2.2:3306 --proxy-backend-addresses=192.168.2.3:3306
- On your data nodes edit your /etc/mysql/my.cnf file. Find
bind-address and change its IP to the node’s IP address. Also ensure that you have commented out any occurrence of skip-networking.
- Again on your client nodes, log in to mysql and grant access to your cluster table to a user on HHCluster1 – for example:
GRANT ALL ON elggcluster.* TO `root`@`HHCluster1.local` IDENTIFIED BY '[some password]'
Installing elgg
Unfortunately as it stands, you need to make some code changes to the vanilla version of Elgg in order for it to work in a clustered environment. These changes are necessary because of the restrictions placed on us by the ndbcluster engine.
Two things in particular cause us problems – ndbcluster doesn’t support FULLTEXT indexes, and it also doesn’t support indexes over TEXT or BLOB fields.
FULLTEXT is for searching and is largely not used in the vanilla install of elgg, so I removed them. Equally, most indexes blobs one can live without, the exception being on the metastrings table.
Metastrings is accessed a lot, so the index is critical. Therefore I added an extra varchar field which we’ll modify the code to include the first 50 characters of the indexed text – this is equivalent to the existing index:
CREATE TABLE `prefix_metastrings` (

`id` int(11) NOT NULL auto_increment,

`string` TEXT NOT NULL,

`string_index` varchar(50) NOT NULL,

PRIMARY KEY (`id`),

KEY `string_index` (`string_index`)

) ENGINE=ndbcluster DEFAULT CHARSET=utf8;
And the modified query:
$row = get_data_row("SELECT * from {$CONFIG->dbprefix}metastrings where string=$cs'$string' and string_index='$string_index' limit 1");
Mysql’s optimiser checks the index first so this doesn’t lose a significant amount of efficiency (at least according to the explain command).
» Modified schema
The next problem is that the system log currently uses INSERT DELAYED to insert the log data. This is also not supported under the clustered engine.
There are a number of approaches we could take including using Elgg’s delayed write functionality or writing a plugin which replaces and logs to a different location.
For the purposes of this test I decided to just comment out the code in system_log().
What won’t work
Currently there are a couple of core things that won’t work under these changes, here is a by no means complete summary:
- The system log (as previously described). This isn’t too much of a show stopper as the river code introduced in Elgg 1.5 no longer uses this.
- The log rotate plugin as this attempts to copy the table into the archive engine type and we can’t guarantee which node it will be executed on in this scenario.
- Any third party plugins which attempt to access the metastrings table directly (of which there should be none as direct table access is a big no no!)
Anyway, here is a patch I made against the released version of 1.6.1 with all the code changes I made. Once you have applied this patch to your Elgg install you should be able to proceed with the normal Elgg install.
Let me know any feedback you may have!
» Elgg Clustering patch for Elgg 1.6.1
Top image “Birds-eye view of the 10,240-processor SGI Altix supercomputer housed at the NASA Advanced Supercomputing facility.”