Screenshot-Dashboard - Google Chrome So, the other week I made a simple security device for my house, using a Raspberry Pi, that will (when I have a moment to wire it up), give a read out before I leave the house telling me if I have any windows or doors open.

Since I’ve been coding this Home API thing, the next obvious step is to wire the it up to the API so other things could make use of the data.

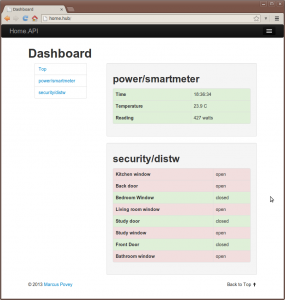
The first step was to modify the code running on the Raspberry Pi to transmit the status of each switch to a central server as a JSON POST request whenever something changed. On the server, I wrote a plugin which accepted this payload and stored for display, using the newly coded CouchDB support. This means that Home.API doesn’t have to poll the device, which would be more complicated and less efficient.

Sending data Home.API

Here is the client code, complete with Home.API integration:

The important lines of code are between lines 68 and 78. These lines check whether an update needs to be sent (we check for a state change in one of the lines we’re monitoring, and raise a flag if it is different from the last pass), and then package up an array of results as a JSON object and fire it over to Home.API using HTTP.

In our plugin

On the server, our class endpoint is loaded, and our decode method called. For efficiency we store this in a NoSQL database, which our display function getAll() just echos the contents off.

public function update() {
$result = json_decode(\home_api\core\Input::getPOST());

if ($result === NULL)
throw new \home_api\plugins\PluginException(i18n::w ('raspberrypidistw:exception:no_json_data'));

// Decode status
$this->status = array();
foreach ($result as $key => $value)
$this->status[$key] = $value;

// Create couch store
$uuid = \home_api\storage\nosql\NoSQLStorage::generateUUID($this, 'LastValues');
$couch = \home_api\storage\nosql\CouchDB::getInstance();

// See if there is an existing status
$latest = $couch->retrieve($uuid);
Log::debug("Retrieved: " . print_r($latest, true));
if (!$latest)
$latest = new stdClass();
$latest->status = $this->status;

// Store revision
Log::debug("Updating UUID:$uuid with " . json_encode($latest));
return $couch->store($uuid, $latest);
}

Pretty simple, have a play!


So, building on what I did before with lights and switches as well as the stuff I’ve been hacking together with my Home.API, I thought I’d build something that may actually be of practical use. So, here’s a device that will tell you, before you walk out the door, whether all your doors and windows are shut, and for bonus points, tell you when they were opened and closed.

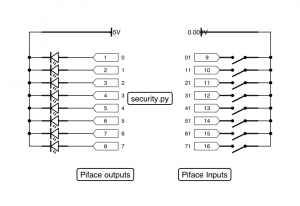
As you can see from the video, my local Homebase didn’t have all the bits, so you’ll have to use your imagination a little. The “Real” version would use simple magnet + reed switch burglar alarm fittings connected with bell wire to the terminals on your Piface. An indicator panel connected on the PiFace’s output panel should sit somewhere visible by your front door.

The software, again written in python, is very simple. It loops through all 8 input connectors and turns on or off the corresponding light when it reads a switch open and closed, when it detects a change it writes some output to the terminal and writes a message to the system auth log. This last feature is made even more useful if you configure the Raspberry pi to send its logs to a central server, as I have previously written about.

The next obvious thing to do is to interface this system with the Home API, which would be straight forward to implement (and I will implement when I get a moment!)

Here’s the circuit:

Click on the circuit to see a larger image…

securitysystem

…and here’s the code:

Enjoy!

experiment 2 - traffic lights In the last experiment I wired up LEDs to each one of the PiFace’s outputs and cycled through them. In this one, I decided to try a slightly more “real world” application, and build a set of traffic lights.

Since I live in the UK, these are the UK three light traffic lights (red/amber/green) and follow the UK light sequence – RED, RED/AMBER, GREEN, GREEN, AMBER, RED.

The Circuit

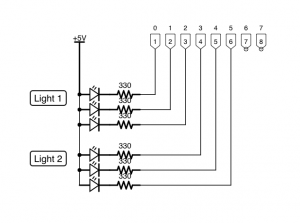
The circuit here is very similar to the one used for the previous experiment, but will only use six of the available eight control outputs. Each light contains a set of three LEDs connected to one of the pins of the PiFace’s output interface, one red, one amber and one green.

See the attached diagram.

The Software

The code for this experiment is where the extra complexity resides, since we must drive each light in the correct sequence and obeying certain rules:

  • The lights must transition in the correct, UK, sequence, i.e. RED, RED/AMBER, GREEN, and then GREEN, AMBER, RED.
  • For traffic safety, the green light must transition to red before the red light transitions to green.

To avoid repeating myself, I created a simple class to drive the lights.

Each class is initialised with the pin number of each light, and an initial status. The Toggle method will transition the light; RED, RED/AMBER, GREEN if status is RED, and GREEN, AMBER, RED if status is GREEN.

The main loop of the program waits for a period of time, then toggles the lights, starting with the green one.

Here we have it in action…